
Looking for an eco-friendly way to generate power? An earth battery might be the answer. These simple setups use soil as an electrolyte, paired with two different metals like copper and zinc. A single cell can produce between 0.5V and 5V, making it useful for small-scale energy needs.
Connecting multiple cells in a series increases the total voltage. This method is cost-effective and ideal for powering low-energy devices. Whether for DIY projects or off-grid solutions, this approach taps into natural resources without complex setups.
Materials like copper wire and aluminum are key components. Adding capacitors helps stabilize the circuit. With proper handling, these systems can be a sustainable alternative to traditional options.
Key Takeaways
- Earth batteries use soil as an electrolyte with dissimilar metals.
- Series connections boost voltage for practical applications.
- Ideal for small electronics and renewable energy projects.
- Cost-effective compared to conventional power sources.
- Requires basic materials like copper, aluminum, and capacitors.
What Is an Earth Battery and How Does It Work?
Ever wondered how damp dirt can generate electricity? The answer lies in *redox reactions*. These natural processes drive earth batteries, where two dissimilar metals—like zinc and copper—exchange electrons through moist soil acting as an electrolyte.

The Science Behind Earth Batteries
When zinc and copper are buried in wet ground, zinc loses electrons (oxidizes), while copper gains them (reduces). This creates a tiny current. It’s similar to a lemon battery but uses soil’s ionic conductivity instead of citric acid.
Soil composition matters. Clay-rich or saline soils work better due to higher ion content. Moisture is critical too—dry dirt won’t conduct well.
Why Use Crystal Cells in Series?
A single cell might produce just 1V, but connecting 12 in series delivers 12V—enough for small devices. Each cell’s voltage stacks, like linking flashlight batteries.
Note: The soil isn’t the power source. It’s the medium enabling electron flow between the metals.
Materials and Tools Needed for Your Earth Battery
Ready to build your own sustainable power source? Gather these key materials first. The right components ensure efficiency and safety, whether you’re a beginner or a seasoned DIYer.

Essential Metals and Wires
Start with copper spikes—they’re durable and cost-effective compared to tubing. Pair them with galvanized nails (zinc-coated) for the anode. For larger setups, repurpose aluminium oven pans as electrodes.
Connect parts using copper wire. Sandpaper helps clean metal surfaces for better conductivity. High-value capacitors smooth out power fluctuations.
Tools for Assembly and Testing
You’ll need wire cutters to trim wires and a voltmeter to measure output. A long measuring tape and compass help align cells evenly.
Safety tip: Dig shallow trenches away from utility lines. Wear gloves to protect your hands during assembly.
Step-by-Step Guide to Building a Single Cell Earth Battery
Want to harness natural energy with basic materials? Follow this guide to assemble a functional cell using soil and metal. Perfect for beginners, this project requires minimal tools and delivers surprising results.
Preparing the Electrodes
Start by sanding a copper spike and a galvanized nail with sandpaper. Removing oxidation ensures better electron flow. For larger setups, aluminum strips work as lightweight alternatives.

Setting Up the Soil Electrolyte
Mix soil with a pinch of salt to boost conductivity. Moisture is critical—dampen the mixture until it clumps lightly. Avoid oversaturation, as it can slow electron transfer.
| Electrode Material | Pros | Cons |
|---|---|---|
| Copper | High conductivity, durable | Costs more than aluminum |
| Zinc (galvanized nail) | Inexpensive, easy to find | Prone to corrosion |
Connecting the Circuit
Link the electrodes with copper wire, ensuring tight connections. Use wire cutters to trim excess length. For stability, add a capacitor to the circuit to smooth voltage spikes.
“Dry soil kills the cell—keep it damp but not soggy for consistent output.”
Test with a voltmeter. No reading? Check connections and soil moisture. Troubleshooting is part of the process!
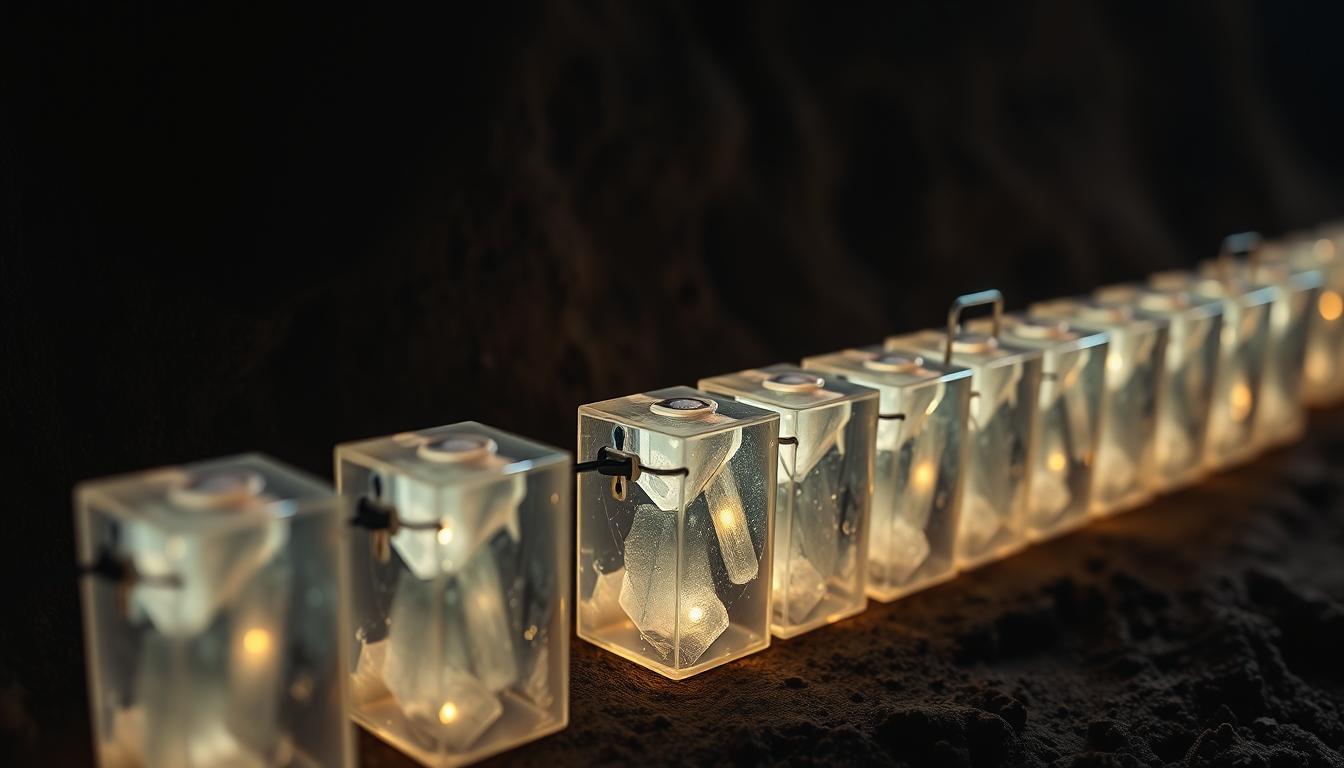
Connecting Multiple Crystal Cells in Series
Stacking cells in series unlocks more power from simple materials. A single unit might not meet your needs, but linking them boosts voltage significantly. This method is ideal for low-energy devices like sensors or LED lights.

Layout and Safety Considerations
Place cells along a fence line or garden edge to avoid tripping hazards. Measure wire lengths using your stride—each step (~2.5 feet) helps estimate distances. Keep the circuit tidy to prevent tangles.
“Capacitors are your best friend for smoothing erratic output—don’t skip them!”
Wiring the Cells for Optimal Voltage
Connect electrodes in a copper→aluminum→copper chain. Strip copper wire ends and twist them tightly around each electrode. This ensures minimal resistance and max energy transfer.
| Wire Type | Best For | Limitations |
|---|---|---|
| Copper | High conductivity, durable | Costs more than aluminum |
| Aluminum | Lightweight, affordable | Prone to oxidation |
A 12-cell setup can deliver 12 volts—enough to power off-grid power needs like garden lighting. Test each connection with a voltmeter before finalizing your project.
Testing and Optimizing Your Earth Battery
Got your setup ready? Now it’s time to fine-tune it for maximum efficiency. Proper testing ensures your system delivers consistent energy, while small tweaks can significantly boost performance.

Using a Voltmeter to Measure Output
Place the voltmeter probes across the copper and zinc terminals. A reading below 0.5V? Check soil moisture—damp dirt should show 1V–5V. Dry or compacted ground reduces electron flow.
Compare salted vs. unsalted mixtures. A pinch of salt increases conductivity by up to 30%. For erratic readings, inspect wire connections—loose links disrupt the circuit.
Enhancing Performance with Capacitors
Capacitors stabilize fluctuating currents. Add a 10µF capacitor parallel to the output to smooth spikes. This is crucial for powering sensitive devices like LEDs.
“Joule thief circuits can amplify low voltage—perfect for dim LEDs. Try this off-grid power hack for better results.”
Replace corroded nails every 3–6 months. Re-wet soil weekly to maintain conductivity. With these tweaks, your setup becomes a reliable home energy solution.
Practical Applications of Earth Batteries
What can you actually power with a simple soil-based setup? These eco-friendly systems shine in low-energy scenarios, from backyard projects to renewable experiments. Let’s explore where they deliver real value.

Everyday Gadgets Powered by Soil
A single cell generating 1V–5V can run basic electronics. Ideal for off-grid power, these setups work best with devices like:
- LED garden lights (1.5V–3V)
- Digital calculators (2V–3V)
- Soil moisture sensors (3V–5V)
| Device | Required Voltage | Cells Needed |
|---|---|---|
| Wall Clock | 1.5V | 2 in series |
| AM/FM Radio | 3V | 4 in series |
Beyond Basics: Renewable Energy Innovations
Kingston University’s workshop demonstrated how earth batteries can split water into hydrogen for BBQ pits. By connecting multiple cells to an electrolyzer, they produced HHO gas—a clean fuel alternative.
“Scaling this tech could empower off-grid communities. Imagine ‘battery farms’ powering irrigation sensors or emergency radios.” — Kingston Renewable Energy Lab
Share your results with @natsatclub! Whether it’s a tiny nightlight or a hydrogen generator, every post inspires new DIY energy solutions.
Conclusion
Harnessing natural energy with simple materials is easier than you think. These setups offer a sustainable way to generate small-scale power using just soil, copper, and zinc. The key? Keep the ground damp and pair the right metals for optimal electron flow.
Experiment with different cell counts and soil types to boost output. For advanced tweaks, check guides on Instructables or similar DIY platforms. Ready to dive in? Grab some wire, dig into your backyard, and start building today!
Whether for garden lights or science projects, this method proves that innovation doesn’t need complexity. Try it—your first circuit could light up more than just an LED.